ESLint: Setting Up from Start to Finish
In this article, I'll discuss ESLint, the tool that ensures your JavaScript code remains consistent and clean. I'll guide you through setting it up, customizing its behavior, and integrating it with Prettier and VS Code.
ESLint is a powerful tool designed to keep your JavaScript code clean, error-free, and consistent. Its value of ESLint lies in its ability to enhance code quality, readability, and maintainability. By catching errors early and promoting best project's practices, ESLint can save you time and help maintain high standards in your JavaScript development.
In this article, I'll discuss ESLint, the tool that ensures your JavaScript code remains consistent and clean. I'll guide you through setting it up, customizing its behavior, and integrating it with Prettier and VS Code.
How to install ESLint?
You can install and configure ESLint by running the following command that fires the setup process and prompts you with a few questions about the required config.
npm init @eslint/config@latest
We are developing a classic browser app using ESM modules (you might want to check out our Vite setup guide) so we select those options and the tool will install the required packages and create a basic configuration file which looks like here.
import globals from "globals";
import standard from "@eslint/js";

export default [
  standard.configs.recommended,
  {
    languageOptions: {
      globals: globals.browser
    },
  },
];
How to use ESLint?
By default, ESLint applies its recommended rules to check the code for violations, so let’s choose a few of these rules to break and see how the tool flags the issues.
class Test {
  constructor() {
    if (false) debugger
  }
}
import standard from "@eslint/js";

export default [
  standard.configs.recommended,
  {
    ignores: [
      'dist',
      'vendor',
      'node_modules'
    ],
    rules: {
      curly: 'error',
    }
  },
];
You can check the code for violations by running the eslint command and specifying a file, directory, or glob pattern to check. If you skip this, the tool will search all the JS files relative to the current directory. We can use one of the following commands:
yarn eslint resources/scripts/blocks.js

/footmate.pro/wp-content/themes/footmate/resources/scripts/blocks.js
  1:7   error  'Test' is defined but never used  no-unused-vars
  3:9   error  Unexpected constant condition     no-constant-condition
  3:16  error  Expected { after 'if' condition   curly
  3:16  error  Unexpected 'debugger' statement   no-debugger

✖ 4 problems (4 errors, 0 warnings)
  1 error and 0 warnings potentially fixable with the `--fix` option.
yarn eslint resources/**/*.js

/footmate.pro/wp-content/themes/footmate/resources/scripts/blocks.js
  1:7   error  'Test' is defined but never used  no-unused-vars
  3:9   error  Unexpected constant condition     no-constant-condition
  3:16  error  Expected { after 'if' condition   curly
  3:16  error  Unexpected 'debugger' statement   no-debugger

✖ 4 problems (6 errors, 0 warnings)
  1 error and 0 warnings potentially fixable with the `--fix` option.
yarn eslint

/footmate.pro/wp-content/themes/footmate/resources/scripts/blocks.js
  1:7   error  'Test' is defined but never used  no-unused-vars
  3:9   error  Unexpected constant condition     no-constant-condition
  3:16  error  Expected { after 'if' condition   curly
  3:16  error  Unexpected 'debugger' statement   no-debugger

✖ 4 problems (4 errors, 0 warnings)
  1 error and 0 warnings potentially fixable with the `--fix` option.
The tool correctly identifies the rule violations that we intentionally created. While most of the issues it finds in this case need to be addressed manually, there is one that can be automatically fixed. To apply this automatic correction and reduce your work, you can use a similar command as before but also add the --fix flag.
yarn eslint --fix

/footmate.pro/wp-content/themes/footmate/resources/scripts/blocks.js
  1:7   error  'Test' is defined but never used  no-unused-vars
  3:9   error  Unexpected constant condition     no-constant-condition
  3:17  error  Unexpected 'debugger' statement   no-debugger

✖ 3 problems (3 errors, 0 warnings)
Now, you'll need to address the remaining issues manually. Once these corrections are made, and you run the linter again, you should no longer see any problems.
You can also add a script to the package.json to run ESLint with other linters together with a single command. That's a standard approach in our codebase.
{
  "scripts": {
    "build": "vite build",
    "dev": "vite",
    "lint": "prettier . --check; stylelint resources/**/*.scss; eslint",
    "format": "prettier . --write; stylelint resources/**/*.scss --fix; eslint --fix"
  },
}
How to ignore code in ESLint?
You have several options for skipping code checks in your project, which should, of course, be used with caution! If you want to ignore entire directories, you can utilize the ignores key in your config file and specify them there. We don’t want to check the output files and external code, so we exclude the dist, vendor, and node_modules directories. If you need to handle more advanced scenarios, just check out the docs.
export default [
  standard.configs.recommended,
  {
    ignores: [
      'dist',
      'vendor',
      'node_modules'
    ],
  },
];
You can also disable checks for specific parts of your code using a common approach for linters, which involves using comments. For more detailed guidance and additional examples, just check out the official documentation!
class Test {
  /* eslint-disable */
  constructor() {
    if (false) debugger
  }
  /* eslint-enable */
}
class Test {
  constructor() {
    if (false) debugger // eslint-disable-line
  }
}
class Test {
  constructor() {
    // eslint-disable-next-line no-debugger
    if (false) debugger
  }
}
/* eslint no-debugger: "off" */
class Test {
  constructor() {
    if (false) debugger
  }
}
How to configure ESLint?
To alter the tool's behavior, you should now modify the eslint.config.js file created during the initial setup. I haven't delved into any advanced configurations yet, so I recommend exploring this on your own, but for me, the most I need is choosing the coding standards and adjusting rules, and that can be easily managed
import standard from "@eslint/js";

export default [
  standard.configs.recommended,
  {
    ignores: [
      'dist',
      'vendor',
      'node_modules'
    ],
    rules: {
      curly: 'error',
    }
  },
];
In this example, we use eslint:recommended rules as a foundation for code checks. Also, we configured it to ignore certain directories and enforced the use of curly braces.
What is the best JS coding standard?
The default config uses eslint:recommended rules, which serve as a good base, but I need something more. A few years ago, while exploring various JavaScript coding styles, I came across Airbnb's style guide, however, I found it to be too much for my needs. Then I discovered Standard JS, which is also quite popular and seemed more manageable.
So in the projects I make I've decided to adopt and test Standard JS to see how it aligns with my coding requirements. If you're interested in this as well, start by installing the eslint-config-standard package that adds support for its rules in ESLint.
yarn add eslint-config-standard --dev
Then configure it within the eslint.config.js file. I also recommend reading through all the rules it enforces and making any necessary adjustments to suit your specific needs.
import globals from "globals";
import standard from "eslint-config-semistandard";

export default [
  standard,
  {
    rules: {
      "space-before-function-paren": ["error", "never"],
      "curly": ["error", "all"],
      "comma-dangle": ["error", "always-multiline"],
      "padding-line-between-statements": ["error", {
        "blankLine": "always",
        "prev": "*",
        "next": "return"
      }]
    }
  },
];
You might wonder why I don't use WordPress Coding Standards for JS even though I primarily focus on custom WordPress development. I've already discussed this decision so I recommend checking the full material for a detailed explanation. Here I'll leave you with a fun fact - WordPress coding standards are built on top of those used by jQuery!
How to integrate ESLint with VS Code?
ESLint offers an integration plugin for VS Code, making it incredibly easy to get started - simply install the plugin and start using it! The tool will highlight any issues in your code that don't align with the selected rules.
To fix issues, you can either run the fix script in the terminal or use the cmd + shift + p shortcut in VS Code, type "fix," and select "Fix all auto-fixable problems" to automatically format the code. Additionally, you can configure ESLint to format the code upon saving. However, be aware of potential conflicts with Prettier!
How to integrate ESLint with Prettier?
ESLint checks formatting rules, which can lead to conflicts with Prettier, another tool we use in our system. What conflicts? Let's check out the following example.
class Test {
  log() {
    console.log('blocks');
  }
}
{
  "singleQuote": false
}
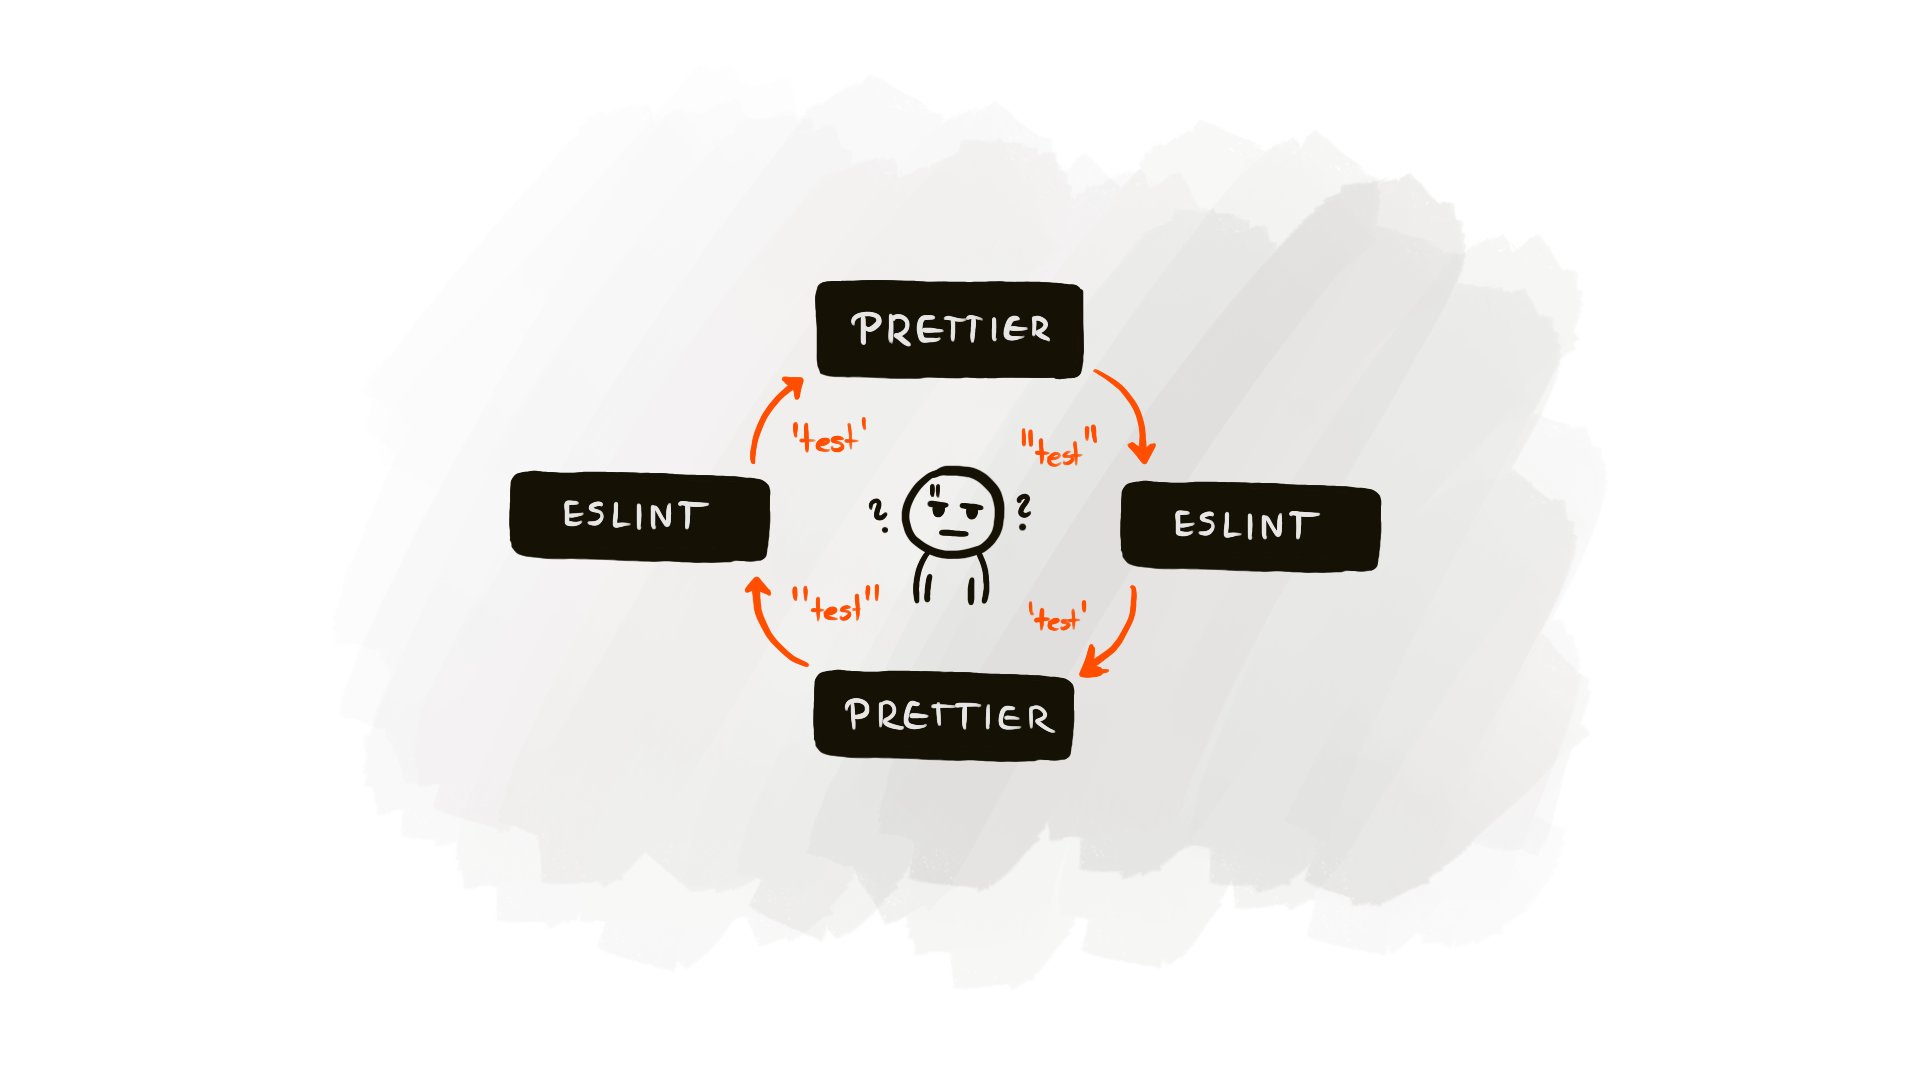
Prettier in our setup is configured to use double quotes, while ESLint is set to enforce single quotes. When the code is formatted with Prettier, it converts all single quotes to double quotes. This action triggers ESLint to flag these as issues, and if automatic corrections are enabled, ESLint changes them back to single quotes. Then, if Prettier runs again, it marks these single quotes as incorrect and changes them back to double quotes. This creates a cycle where whichever tool is used last could overwrite the changes made by the other, leading to a war between the two formatters.
A similar issue occurred with Stylelint, but as you may recall, we didn't need to make any adjustments in the latest versions because Stylelint no longer handles formatting rules. However, for ESLint, while formatting rules are deprecated, they have not yet been removed. So, to avoid conflicts between those two tools, we need to disable the rules that overlap with what Prettier handles. We can do it by installing an additional config.
yarn add eslint-config-prettier --dev
{
  "root": true,
  "extends": ["semistandard", "prettier"],
  "rules": {
    "space-before-function-paren": ["error", "never"],
    "curly": ["error", "all"],
    "comma-dangle": ["error", "always-multiline"],
    "padding-line-between-statements": ["error", {
      "blankLine": "always",
      "prev": "*",
      "next": "return"
    }]
  }
}
Summary
Thanks for staying with me! If you found this material helpful and want to keep up with our latest content, consider subscribing and hitting the bell icon so you don’t miss out on any updates. Giving us a thumbs up lets us know you appreciate our work and helps more people find it. Stay tuned and stay informed!
Feedback
How satisfied you are after reading this article?